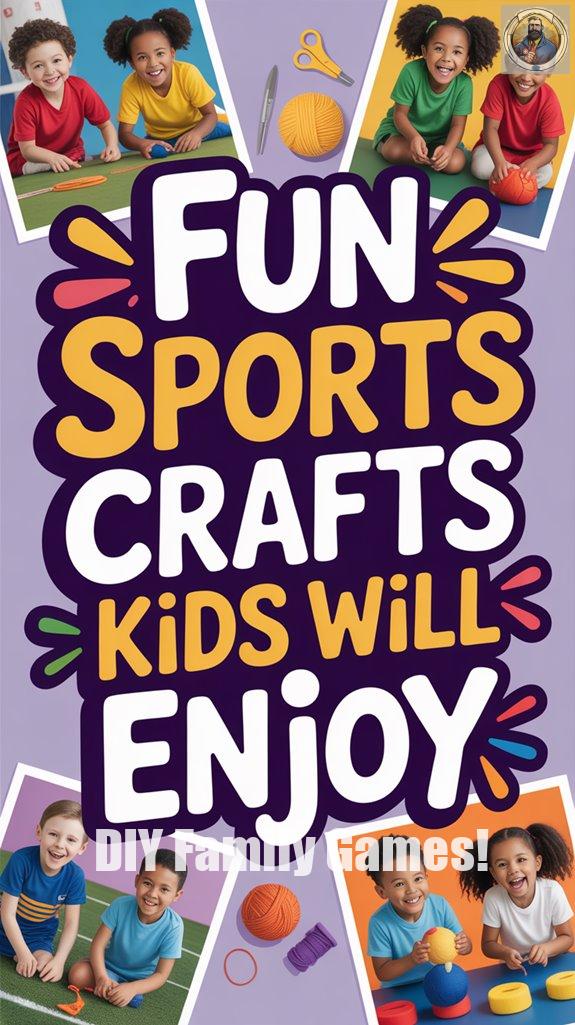
11 Easy Sports Gear Crafts Kids Will Love
Unleashing Creativity with Sports Gear Crafts****
I love sports and I love crafts, so combining the two? Pure genius! As a dad, I’m always on the lookout for fun projects that bring my kids together while having a blast.
At Modern Dads, I share easy and entertaining ideas, like turning old tennis balls into quirky planters. Imagine your kids planting tiny flowers into those fuzzy green spheres.
Don’t forget about the DIY basketball hoop made from a plastic bucket. It’s practically a slam dunk for boredom!
Crafting isn’t just about glue and glitter; it’s about making great memories with your little ones.
Last summer, we had a blast making frisbee tie-dye masterpieces in the backyard. The kids were so excited, they accidentally splattered me with dye. Guess what? I rocked that rainbow look all day! It turned into an epic water balloon fight afterward. Who knew sports gear could bring so much joy?
Crafting has its challenges, but those messy moments? Pure gold for bonding. This is what fatherhood is about—creating laughter and unforgettable moments over a little creativity.
Let’s keep getting crafty together!
Quick Takeaways
- Transform old tennis balls into planters by cutting them, adding soil, and planting tiny plants for a fun gardening project.
- Use old volleyballs to create quirky pet toys that entertain and engage furry friends during playtime.
- Repurpose worn shoes as unique planters, adding a creative touch to gardens and outdoor spaces.
- Craft mini basketball hoops from plastic buckets and paper plates for indoor fun and active play.
- Design custom team t-shirts with fabric paint, allowing kids to express creativity and showcase team spirit.
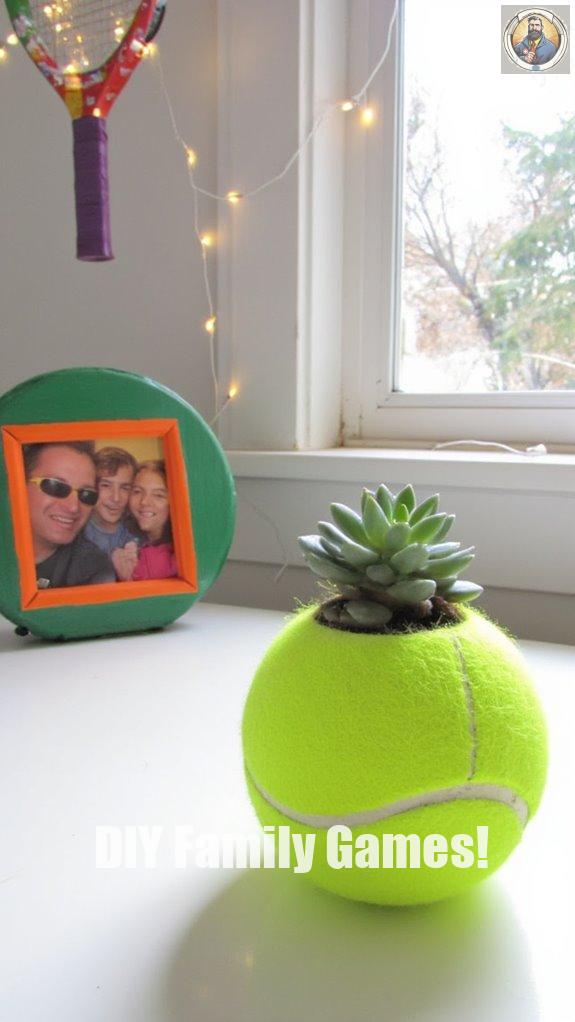
Tennis Ball Planters
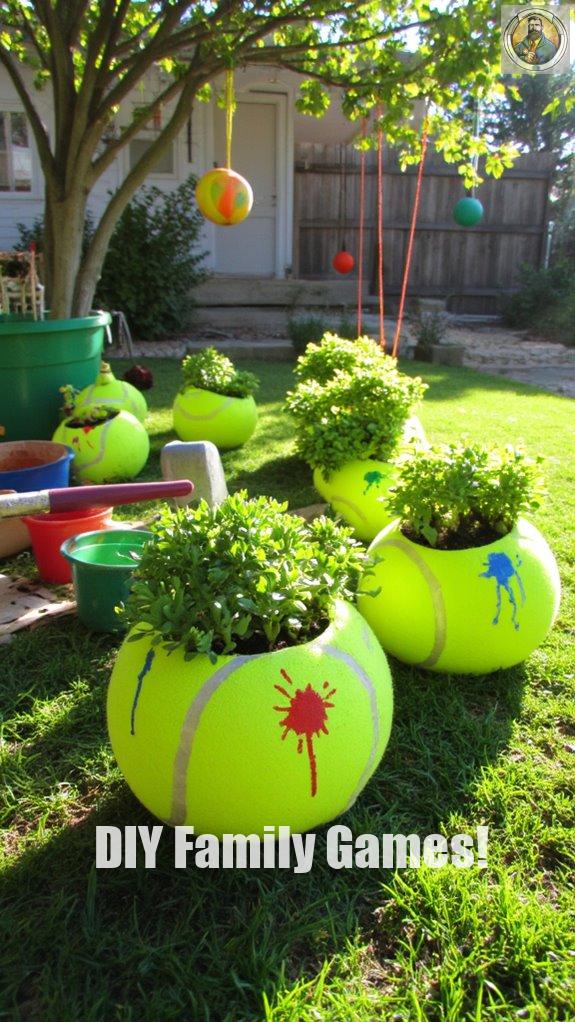
When it comes to fun crafts with a twist, tennis ball planters are a solid hit!
Imagine turning an old tennis ball into a quirky little garden. Who knew eco-friendly planters could be so much fun? Engaging in imaginative play together can enhance not only creativity but also deepen the bond between you and your child!
Here’s how I do it:
Get creative with old tennis balls—cut, plant, paint, and hang for an eco-friendly planter garden!
- Cut a slit in a tennis ball.
- Add potting soil and your favorite tiny plant (if it can survive my black thumb).
- Use colorful paint to spruce it up!
- Hang ’em around in your backyard for a full tennis ball garden!
Trust me, it’s a great way to ace your craft game and keep the planet smiling!
DIY Basketball Hoop
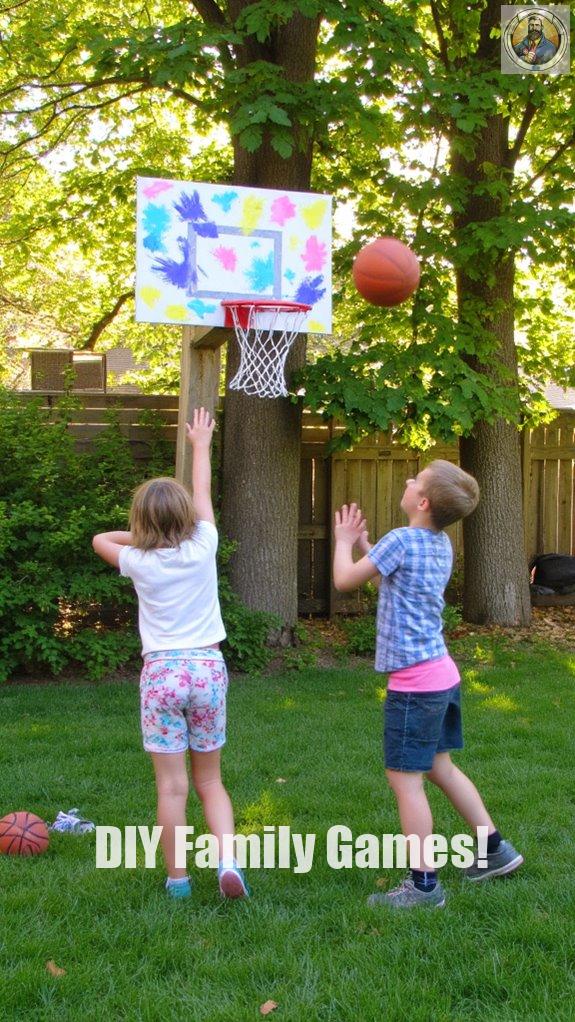
Looking to add some excitement to your backyard?
Why not craft a DIY basketball hoop? Trust me, it’ll have your kids dunking like pros!
Here’s what you’ll need:
- An old bucket or washtub (we have plenty of those lying around, right?)
- A sturdy piece of plywood as a backboard
- Some basketball netting (or use a hanger if you’re feeling creative!)
Using simple crafting techniques, secure the hoop to the backboard and attach it to a tree or wall.
Just envision the cheers (or the epic fails) as they take their shots!
Remember, it’s all about fun, not just winning—unless you want bragging rights! Including your kids in active play encourages family physical activities, making it a great way to bond while staying fit.
Frisbee Tie-Dye Art
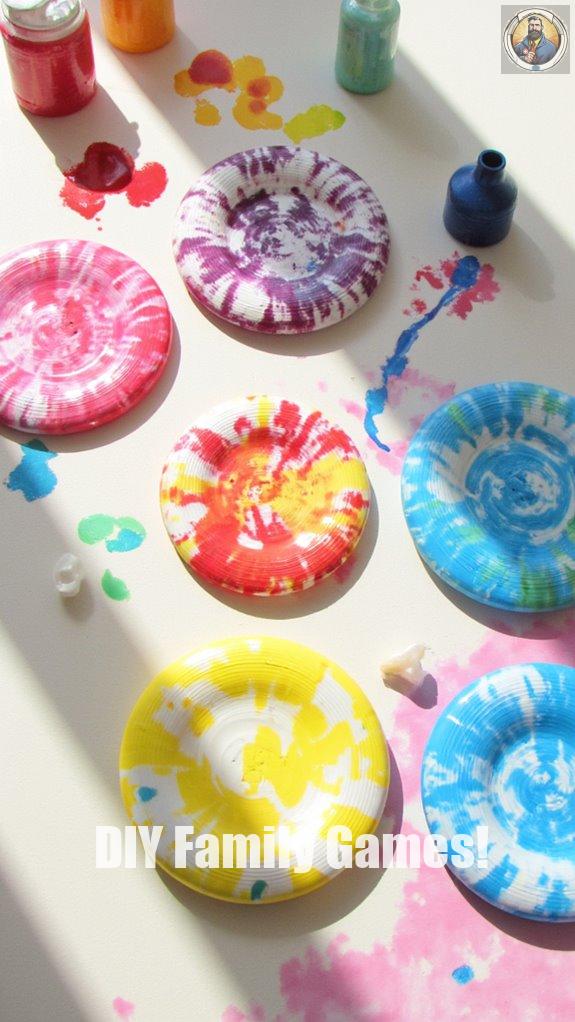
Frisbee tie-dye art is one of my favorite weekend projects, and it can be yours too!
Talk about a colorful way to spruce up your Sundays!
Get ready to brighten up your weekend with a splash of color!
Here’s how we do some frisbee painting:
- Grab plain white frisbees (you probably have some in the closet, right?).
- Get vibrant colors of fabric dye. No, not your cat’s fur; that’d be a disaster!
- Lay your frisbee flat and squirt on the dyes.
What’s better than a flying disc that looks like it’s wearing a rainbow?
After it dries, challenge your pals.
Just keep in mind — they’ll be too distracted by the colors to focus on winning!
Upcycled Baseball Cap Wall Art
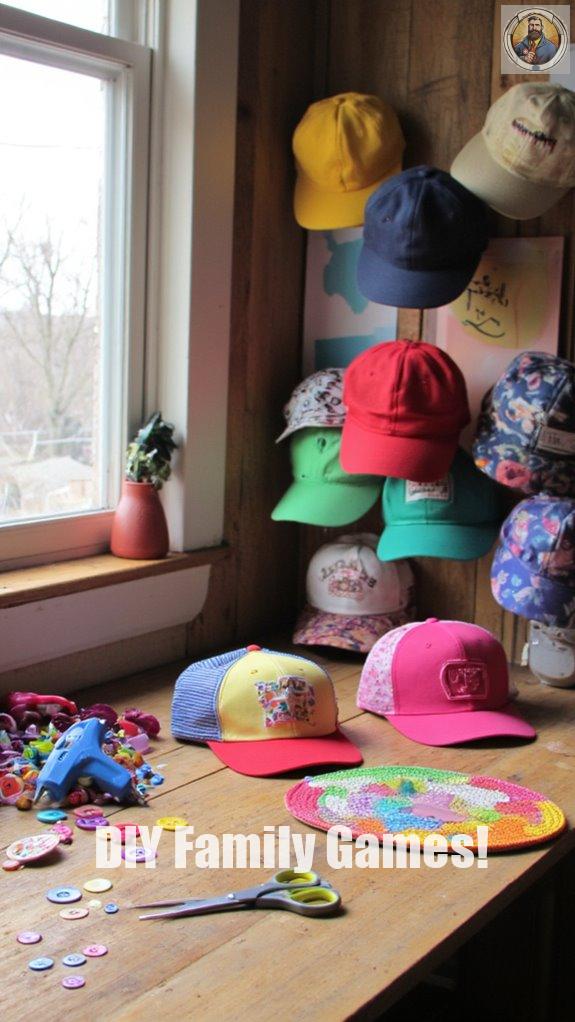
Upcycling a bunch of old baseball caps might just be one of my favorite ways to add some pizzazz to my walls—especially since every hat tells a story!
Think about it:
- Those quirky baseball cap designs you’ve collected? Perfect for wall art!
- Mix different styles and colors for a fun collage—a serious ‘wow’ factor.
- Use wall art techniques like shadow boxes for 3D flair.
Plus, your visitors will be like, “Wow, look at that unique hat gallery!”
And you can reply, “Yeah, I call it ‘The Shrine of Epic Home Runs’.”
Who knew that crafting could be this entertaining?
Sports Equipment Wreath
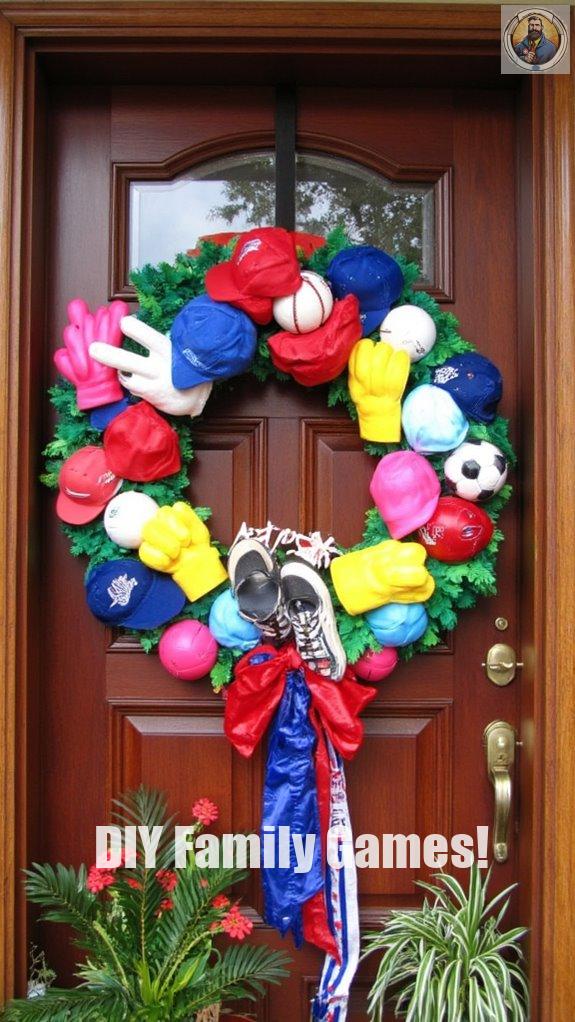
If you’ve got a stash of old sports gear lying around, why not turn it into something fabulous?
Creating a sports equipment wreath is a fun way to showcase your love for sports memorabilia!
Here’s how to do it:
- Gather items like baseball caps, foam fingers, or worn-out sneakers.
- Hey, those shoes could use a new life!
- Use a wire frame, and start wreath decorating by attaching your gear with hot glue.
- Mix and match!
- Add a big bow for good measure.
Your front door will scream, “I’m a sports fanatic!” Who knew wreaths could be so cool?
Soccer Ball Crafts With Paper Mache
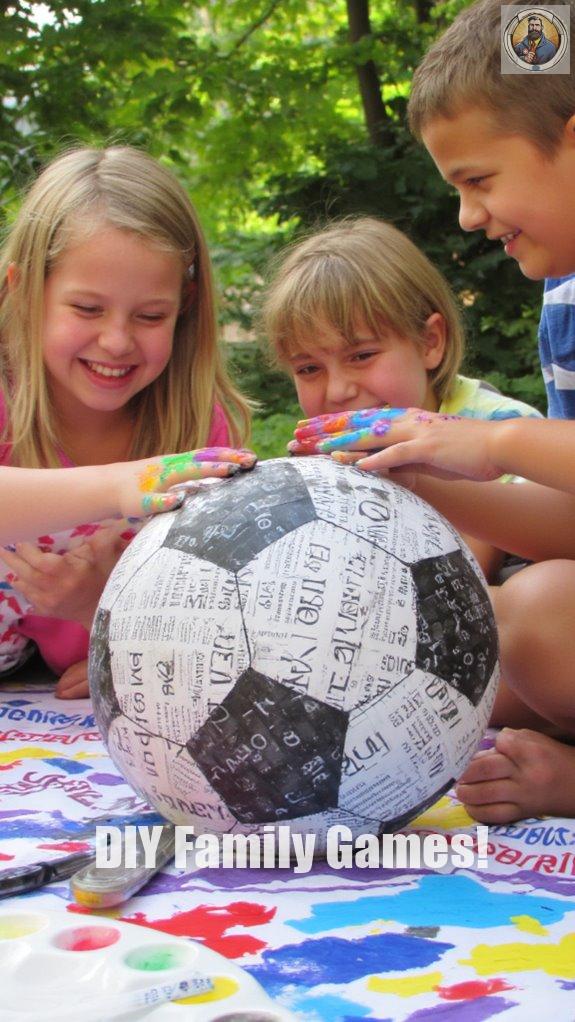
Creating soccer ball crafts with paper mache is an absolute blast! Seriously, who knew mixing gooey stuff could lead to awesome soccer decor? Your kids will be giggling and crafting like crazy!
Here’s what you’ll need:
- Balloons (the rounder, the better for that perfect soccer shape)
- Old newspaper or magazines (because what else would you do with that pile?)
- Non-toxic glue (trust me, the sticky mess will be worth it!)
Get ready for messy hands and maybe a few paper cuts.
Just think, you’ll have a soccer ball masterpiece that could make even David Beckham a little jealous!
Ribbon Dancers From Old Rackets
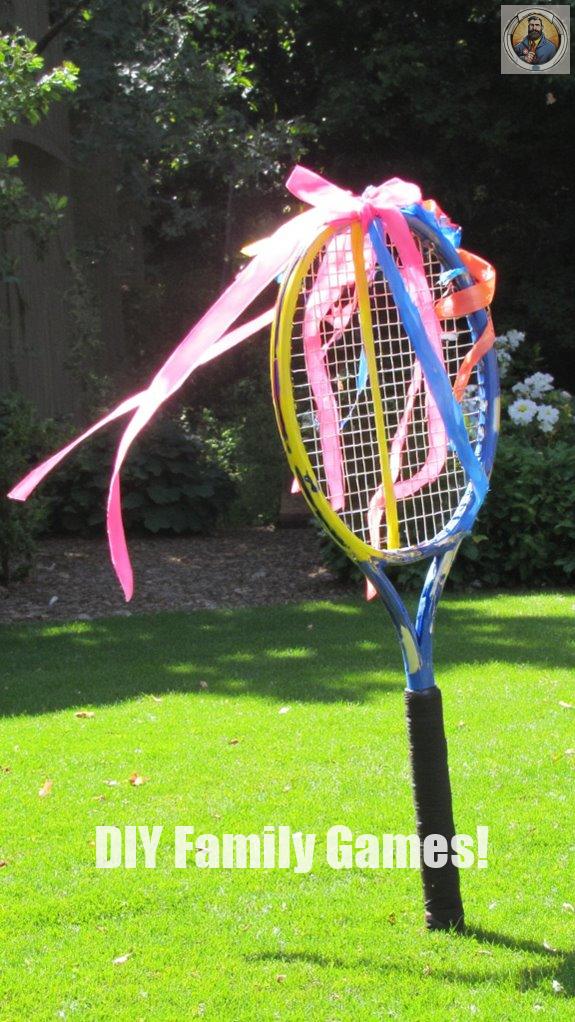
Who knew old rackets could turn into something so incredible?
With a bit of racket reimagining, you can make fabulous ribbon dancers that’ll have your kids fluttering around like they’re auditioning for “America’s Got Talent.”
Here’s how:
- Grab an old racket.
- Attach colorful ribbons to the strings (don’t worry; they won’t steal your spotlight).
- Let the kids twirl them around for a dazzling performance.
You’ll be amazed at how these crafty creations turn bland afternoons into giggle-fests.
Just keep in mind: the more colorful the ribbons, the more spectacular the show.
Now, who’s ready to join my one-racket dance party?
Foam Pool Noodle Golf Course
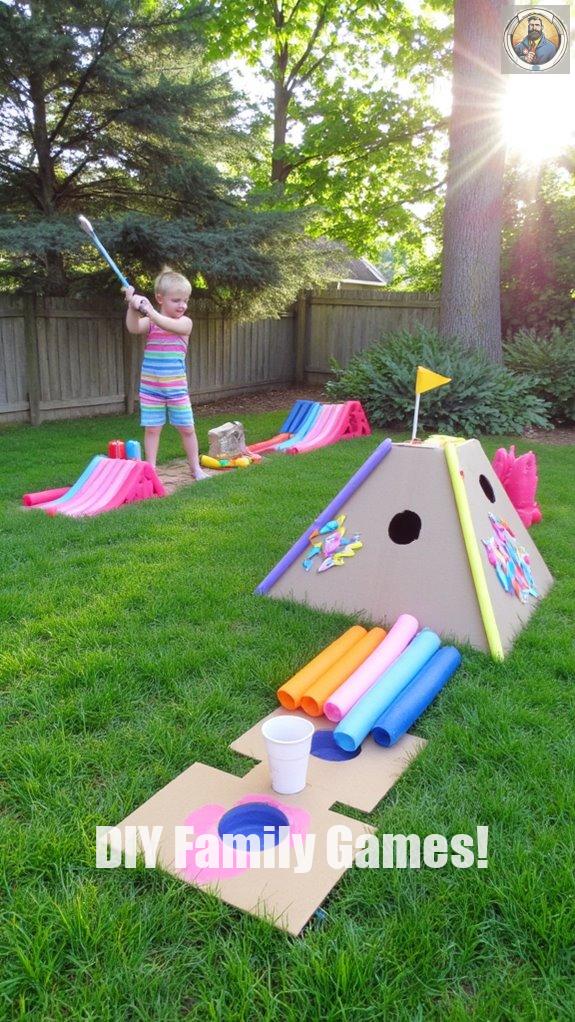
After putting those old rackets to good use with some fabulous ribbon dancing, it’s time to get a little more creative and bring the golf course to your backyard.
Imagine a mini golf setup that’s super fun and won’t break the bank!
Here’s what you’ll need:
- A foam pool noodle (the key MVP here)
- Plastic cups (for those hole-in-one moments)
- Craft sticks or cardboard (to create ramps or obstacles)
Cut the pool noodle into sections, and voilà, each piece becomes a funky golf hole!
Your kids will be swinging like pros— or, you know, trying.
Have fun and don’t forget the scorecards!
Custom Team T-Shirts
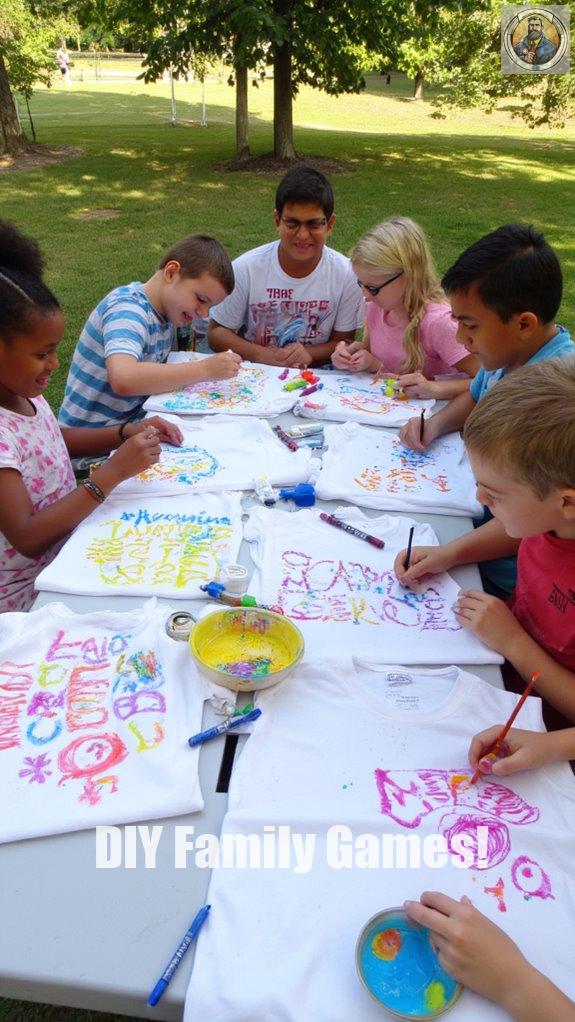
While it’s true that team spirit can shine through competition, nothing quite captures that vibe like custom team t-shirts.
Picture this: you, your friends, and matching shirts that share your team’s motto—priceless!
Custom designs can range from your team name to hilarious inside jokes that only you all get (because who doesn’t love a shirt with a pun?).
Just grab some plain tees, fabric markers, or transfer paper, and let your imagination run wild!
You’ll be the coolest crew on the field, and trust me, you’ll feel the team spirit in every thread.
Let’s bring on those game day selfies!
DIY Volleyball Juggling Balls
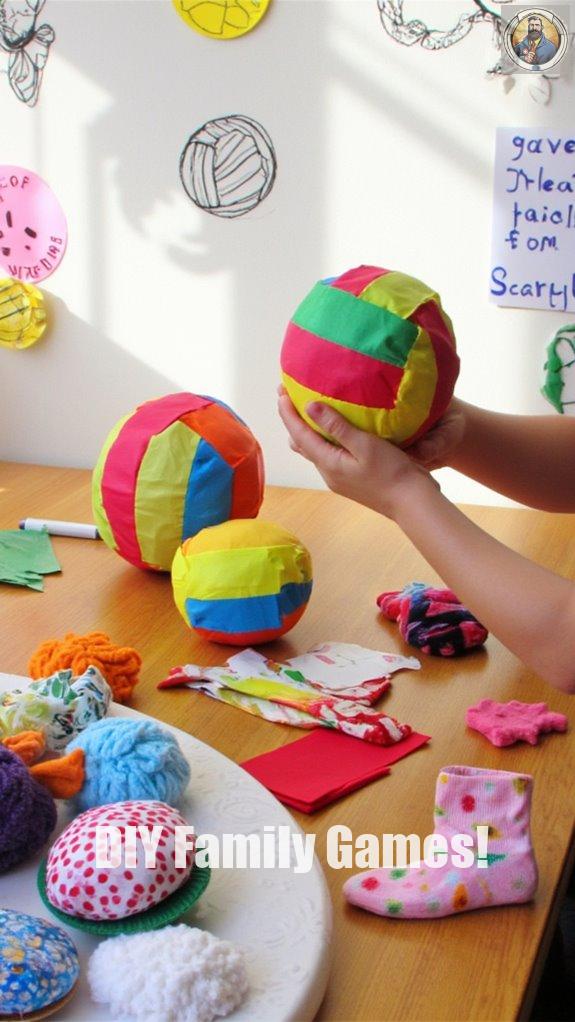
When it comes to showing off your skills, there’s nothing quite like juggling volleyballs to impress your friends.
So, let’s plunge into some volleyball ball making!
Here’s what you’ll need to craft these juggling beauties:
- Old, deflated volleyballs (sorry, past tournaments)
- Soft filling like socks or fabric scraps
- Duct tape (the magic fix-all tool!)
Start by stuffing your volleyballs with the fabric, seal them up tight with duct tape, and voilà!
Now, practice those juggling techniques. You’ll be the next circus star before you know it.
Just be careful not to take out your best friend—unless they owe you lunch!
Repurposed Skateboard Wall Shelf
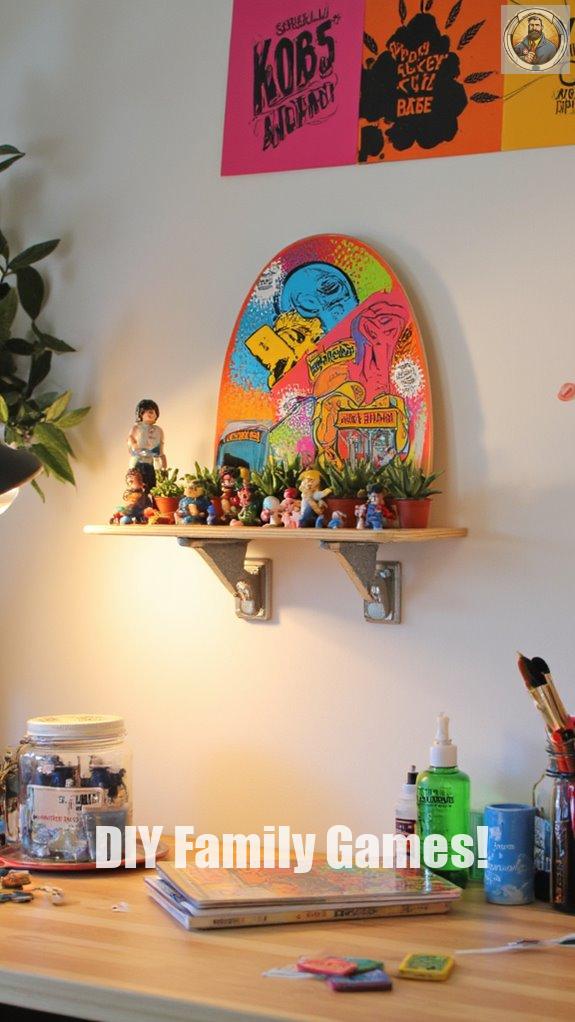
Well, you’re in luck!
Creating a repurposed skateboard wall shelf is a skate-tastic way to upcycle that old board collecting dust in the garage.
Here’s how to get started with this rad skateboard design:
- First, grab your old skateboard (sorry, no random ones you found near the skate park).
- Use sturdy brackets for shelf mounting; you don’t want your prized action figures meeting a tragic end.
- Secure it to a wall and brace yourself for envious looks.
This project’s perfect for kids, sparking creativity while cleaning your space.
Plus, who wouldn’t want to admire a skateboard that’s now a shelf?
Simple Sports Equipment Crafting
Creating simple sports equipment crafts is a fantastic way to release your creativity while giving new life to old gear.
Ever thought about how a recycled tennis ball could become your new favorite doorstop? Or how a playful volleyball can transform into a quirky pet toy? Let’s get crafty!
Here are a few ideas to spark your imagination:
- Tennis Ball Planters: Just cut a slice and add some dirt. Voila! Instant personality for any plant!
- Volleyball Picture Frame: Paint it up and stick in your most embarrassing family photos. You’ll be the talk of the party!
- Racket Wall Art: Add some flair and hang!
Father-Son Team Sports Challenge
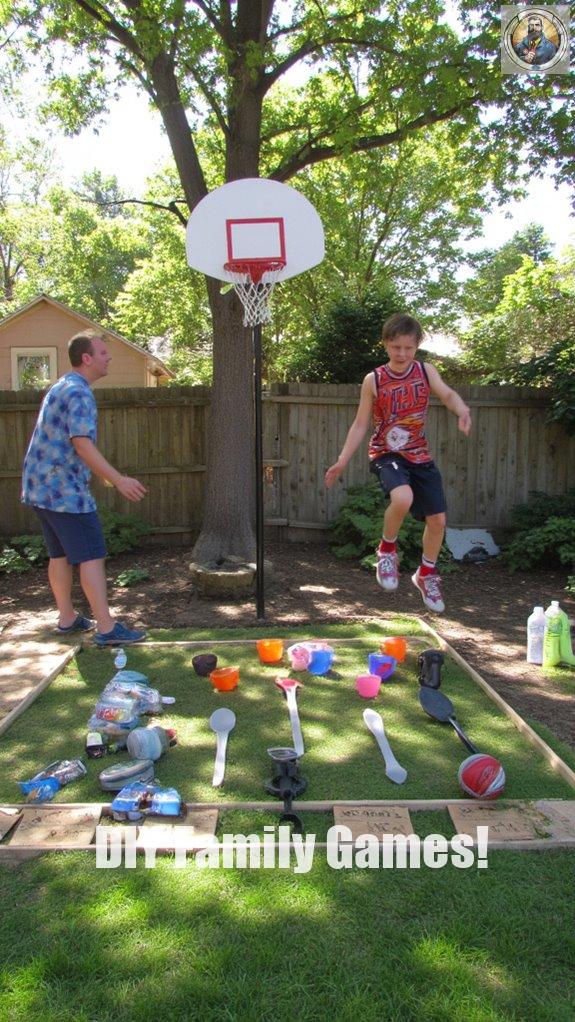
Engaging in a Father-Son team sports challenge isn’t just about showing off athletic skills; it’s an incredible opportunity to bond and create memories that last a lifetime.
Think of it as the ultimate father-son bonding experience—where competition meets comedy!
Here’s how to get started:
- Pick your sport: basketball, soccer, or even a bizarre relay race using kitchen utensils.
- Set goals together. Who’s scoring the most points?
- Use teamwork activities to practice. You might even learn who’s the better aim—spoiler alert, it’s probably not me!
Simple Sports Equipment Crafts for Kids

After that unforgettable father-son sports challenge, why not keep the fun going with some creative crafts?
Creating simple sports equipment crafts is a great way to relive those sports memories and boost team spirit—all while avoiding an accidental soccer ball to the face!
Here are a few crafty ideas to contemplate:
- Mini Basketball Hoop: Use an old plastic bucket and a paper plate for your own indoor league.
- Personalized T-Shirts: Get some fabric paint and let your kids design their own team shirts.
- Athlete Action Figures: Turn those old action figures into your favorite sports players with some paint and accessories.
Ready? Let’s get crafty!
Questions and Answers
What Materials Do I Need for Sports Gear Crafts?
When diving into sports gear crafts, I grab a few key materials.
Don’t worry, you probably have most of these lying around.
Here’s my go-to list:
- Recycled materials like old t-shirts or bottle caps
- Scissors
- Glue or tape
- Markers for added flair
You can make fun projects, like a jersey bag or a bottle cap chess set.
Seriously, who wouldn’t want that?
Let’s get crafty!
How Can I Modify Crafts for Different Age Groups?
When modifying crafts for different age groups, it’s all about those age appropriate modifications and skill level adjustments!
For little ones, think glue and pre-cut shapes—no scissors or hot glue involved.
As kids grow, they can handle more complex tasks.
Here’s a quick list:
- Younger kids? Stick to simple designs.
- Tweens? Add some advanced techniques!
- Teens? Let them express their inner Picasso!
Who knew crafting could be a rollercoaster of creativity, right?
Where Can I Find Sports Gear for Upcycling Projects?
When it comes to finding sports gear for upcycling, I’ve got some fun suggestions!
Hit up local thrift stores and garage sales.
You’ll be amazed at what you can find—old jerseys, tennis rackets, and even baskets!
Plus, it’s like a treasure hunt; who doesn’t love that feeling?
Get creative, mix and match, and laugh at your crafting failures—trust me, I’ve had plenty!
Are There Any Safety Tips for Crafting With Children?
Crafting with kids can be a blast, but let’s not “craft” a trip to the ER, okay?
Child safety is a top priority, so here are some crafting precautions:
- Always supervise sharp tools.
- Use non-toxic materials.
- Set up a clean workspace to avoid messes—like, seriously, glitter isn’t a new wall color!
Keep an eye on them, and keep in mind; when crafting goes wrong, it’s often the parents that get stuck cleaning up.
How Can I Clean and Care for Homemade Crafts?
Cleaning and caring for your homemade crafts? Oh, it’s a blast!
First, dust off dirt and dust like you’re clearing a shelf. For tougher messes, try a mix of mild soap and water.
Don’t forget to air-dry—no one likes soggy crafts!
Here are some quick cleaning techniques:
- Wipe with a damp cloth.
- Use gentle soap—you’re not washing a car!
Remember, a little care makes your creations last longer.
Happy crafting!


